February 16, 2016

film vs. digital irl

This January a bunch of fellow photographers and I embarked on a year long 'picture-a-day project'. Its pretty simple, you just pick a topic or theme, a particular camera and (try to) shoot a single frame each day.  

I choose to shoot (loosely) on the theme of 'transportation' with a Leica and Agfa 'Vista 400' print film. I prefer the exaggerated color and saturation of amateur film vs Portra or Fuji PRO films. The film is sent to Richard Photo in LA for process and large Noritsu scans. 

On some outings (usually over weekend) I'll carry a 6D and shoot alongside my M6. Below are an interesting comparison between the two files. This is strictly an empirical test, I'm processing each file in Lightroom until I like it, I'm not trying to match the files in anyway whatsoever. Both the digital and film files are being shot at 160 for comparison purposes. The results are interesting.

Same debate, different world, here is a great article about famed director of photography Roger Deakins and take on film vs. digital: 
darkhorizons.com/news/41022/roger-deakins-says-shooting-on-film-is-over


Check out some of Chicago native Ali Leroi's Los Angeles picture a day portraits:
instagram.com/misterleroi     

January 21, 2016

Rebuilding Globoscope #74

If you aren't familiar with the 4x5 GlobuScope or the three (remarkable) Globus brothers behind this and the ground breaking GlobuScope360 (which has enjoyed a resurgence in pop culture as a scanner of some sort Art Museum Scene in Ghostbusters II), Globus Studios is certainly worth looking into.

While I can't do them justice here, I will tell you this: they are absolute pioneers in the photographic world. 
Any photo-geek worth their weight in D-76 should spend a little time reading about their contributions to the photographic world that range from developing several notable cameras to one of the brothers contributions to fixing the damaged Hubble Space Telescope.


Long being a fan of the 4x5 Globuscope as well as the look and feel of the 65mm f/8 Super Angulon, the Globuscope 4x5 has been the subject of many of my post conscious-family, nocturnal subterranean searches.  After a couple years of seeing camera bodies  come and go, internet lore will have us believe that 40 or so stainless camera bodies were discovered in the Globus studio in NY.  Regardless of the validity of claim, I was excited that a camera body might soon emerge in my price range.  

After some back and forth with a seller with two camera bodies, we struck a deal for Globuscope 4x5 #74, just about smack dab in the middle of 150 cameras that were made.  Oddly enough, and for you mathematicians out there, I am aware of the peculiar claim of #74 being one of the 40 recently discovered out of 150 made. I would have thought #110-150 or #1-40 would show back up, but who knows... Moving forward, I promise not to have as much coffee as I've had while having my 'happy light' on high mode for well over the recommended hour of AM exposure....but I digress (again...)

How do you take a stamped stainless frame and make it into a fully functioning camera that is ready for the field?  This post is how #74 came back to life. Before starting, I gave myself a couple of ground-rules, I wanted to respect the initial design of the camera, to me, this meant no cutting and drilling. Everything should be reversible.

perfect blend of form AND function

Lens and focus mount: 

The first order of business was getting a lens mounted and focusing.  Searches of the web show lots of different of solutions here ranging from functional to downright absurd. Digging through my boxes of parts, I located the second generation Schneider helical that was inscribed for the 65mm.  Score! In addition it was a perfect fit for the stainless steel opening.  Some of the cameras that I've seen still have the first stage of the Globus focusing mechanism intact. Holding my breath, I got out a dark cloth and a tape measure and measured off 12 feet and it was tack sharp on the ground glass and infinity was infinity!  Perfect. I had the option of pulling a set screw from the helical or filing a very small slot into the camera which will keep the helical from spinning if it ever became loose. I did file the slot and added a very thin bead of gaffers tape so the helical wasn't mounting metal to metal.  The second version of the helical is lighter, focuses easier and is inscribed in both english and metric on opposite sides. Depending on which measuring system you would like to use was which way you oriented the mount.

I do wish I could have found a Linhof Technika select version of the lens as that is (in theory) the very best 65mm f/8 available, but the 65mm I found tested beautifully. From an earlier camera I built, I knew I wanted to finish the lens with the Nikon HK-6 metal shade which was made for the Nikon 20mm f/3.5. The diamater of the Super Angulon to is too small for the shade to mount securely so I cut the center out of a push-on lens cap to serve as a shim.  If you leave the bead from the Schneider lens cap on and reverse it as you slide it over the lens, the shade fits PERFECTLY with a nice little trim bead behind the shade.  

Tripod mount:

both the arca plate and lens shade shim are visible
Everything I build and shoot uses an Arca Plate for quick and secure tripod mounting and I wanted this to be the same. Looking high and low for a 60mm QR plate that also has a female 1/4 20 (incase you ended up somewhere without an Arca mount) yielded nothing.  The camera comes with a pedestal that drops down from the body which I wanted to anchor or connect to the back of the camera.  This would reduce any flex that might incur with the camera mounted to a tripod while sliding holders in and out.  Wanting a solid connection without drilling any holes, I used black adhesive caulk between the camera and the back of the tripod plate.  It will come right off if you every needed to pull it off.  In addition, you could pull it off in the field w/out any tools if need be. 

Finder and finishing touches:

I went back and forth between a black or chrome circular bubble level, I was leaning towards a black anodized level, but my family vetoed, and I went with a chrome level from Geier & Bluhm out of New York.  Great suppliers of levels of all kind for just about any camera project you can dream up. Again, I used white adhesive caulk to adhere it to the top plate. Lastly, short of a Zeiss finder, the very best finders (at any price) are made by Voigtlander.  A black Voigtlander 21mm optical finder was calked onto the existing accessory shoe.   

That just about completes what I did to breath some light back into this beauty and here is the bitter sweet part: I placed the camera on several forums and eBay and went off to load some holders to take it out for a spin.  Before I knew it, the camera sold. And while I knew all along that I couldn't afford to keep it, I was surprised it sold so fast...until I saw who bought it and where it went.  


January 11, 2016

metering, irl

Properly metered and perfectly exposed 
Over exposure caused by in-camera 'reflected' metering
Cleaning out some hard drives I keep finding stuff I  had intended to blog about and just haven't yet.

Buckle up because I'm going to get caught up!

Several semesters ago, I got to teach our intro 101 class and I gotta tell you, I love teaching the very first class in the program.  The excitement and enthusiasm is second to none and putting the foundation of photography into action never gets old for me.

I had great students who were hungry for information so we got to cover a lot of ground.  More often then not, we end up in the studio or outside. We were talking about metering and discussing the pros and cons of in-camera vs. an incident or hand meter. Both have their place, both have their strengths and weaknesses.
Under exposure caused by in-camera metering
So here is the elevator pitch: Modern in-camera meters are good but limited in function.  It can look at a scene, a portion, or an average of a scene and can do only one thing, make it grey. Smack dab in the middle of black and white, it will make grey.

Just like in grade school art class, when you mix all your paint together you get mud, the in-camera meter can only see a scene and tell you to set the camera in the middle of black and white. It is known as middle grey or 18% grey. The in-camera meter can't tell if a shirt is white, grey or black, it only sees tonality.

If you need to create exacting color reproduction or you have specific ideas and expectations from your own work, using an incident meter will be the single fastest way to improve your work.

In film days, the wide exposure latitude of amateur color negative films allowed for fantastic results so long as you were within a stop or two of the proper exposure.

Professional photographers were required to shoot color transparencies, or slide film, in order for their images to be properly scanned, separated into CMYK plates and reproduced on a high speed four color press.

Properly metered, perfectly exposed 
This is what drew the line between professional and amateur photographers 20 years ago. The printing industry needed sharp, well exposed transparencies to make the photography pop off the page so professional photographers needed to carry a light meter and numerous color filters to insure the image that was created in camera would look its best by the time it made it to the printed page.

But whats different today? Nothing, well kinda.  Digital cameras are like more like transparency film then color negative film. The better quality your initial capture, the better your image will be on screen, in an ink-jet print or professionally (four color printed) printed in a book or magazine.

An incident meter, or hand meter isn't fooled by the color and tonality of the subject.

Wait...Whaaaa?

An incident meter is held in front of the subject and measures only the amount of light falling on the subject, NOT the light bouncing off your subject.

Think about these two scenes as an example:

Your subject is a polar bear, eating a vanilla ice cream cone while sitting on the hood of a white BMW...OK now a similar scene only this time you are photographing a black bear, eating chocolate ice cream cone while sitting on the hood of a black BMW.

Crazy right?? I thought bears were like dogs and had trouble digesting chocolate...anyway,  if you photograph each scene using only your in-camera meter (which makes everything middle gray, because that all it knows) then each picture you make will be muddy and grey because that all the camera knows.  If you photograph the same scene but measure how much light is falling on the subject instead of bouncing off of your subject (using your incident meter), the tonality will be perfect for each situation. The polar bear scene will be predominately white, white with detail and lighter greys while the black bear scene will be mostly dark greys and black...as they both should.
Properly metered, perfectly exposed 

My class looked at me a bit puzzle and while they kinda understood what I was saying, it really didn't make click.

So we took a break and met back in the studio and here is what we did:  We took the palest student in class and wrapped her in a roll of white toilet paper that was 'retrieved' from the bathroom put her on a white sweep. She was photographed using both the in-camera meter and an Sekonic incident meter.

Then we took the a student with the darkest complexion, put him in a dark jacket and put him on a black sweep and photographed both way as well.

Both situations and both metering examples are included and while each one of the shots are labeled so you know which is which, the results are so obvious they really don't need labels, its that clear.

in camera metering histograms, both too close to middle grey

June 23, 2015

Tornado damage


Tomorrow morning I'm heading to Coal City to photography the aftermath and the Red Cross aid efforts from last nights tornado.  It can be quite delicate to be asked to photograph after such a devastating event, I hope my images can help the town and the continued efforts of the Red Cross.  
damage from Fairdale Illinois F4 tornado


June 8, 2015

Stretching the Limits...

The early afternoon weather was so nice downtown we took an impromptu field trip to get my class started on their next shooting assignment. 

I grabbed the Canon tilt/shift 17mm and mounted it to my (beater) MkII body just to play around a bit.  

Stitching shifted files is nothing new but, MAN when it's a 17mm I'm still blown away every time!

Here are vertical and horizontal stitches of the largest barge mounted crane I've ever seen!


May 15, 2015

our future...in Plastics...

Maybe the recent announcement of Harrington being 'taught out' (which is a mildly fancy of saying closed) that is causing a sense of nostalgia, maybe it's a couple faculty and staff members who are also showing a renewed excitement and enthusiasm to again shoot film, I'm not sure what it is, but I've found myself in the basement rejuvenating some old one-off creations as well as designing and building cameras again.   I've been doing this for years but the ease of digital and demands of daily life has nearly made the desire to design and build cameras almost extinct. 

Not sure what it was that rekindled the ember and honestly, I don't care, I'm glad it's back.

Which got me thinking.  My projects have always been driven mostly by the 'why' while the 'how' was generally dictated by the means at my disposal.  Whatever camera components and raw materials were at my disposal would be fashioned onto something new.  Here is my 6x17 'torpedo' camera and a 24mm x 4 1/2 camera that I shot with for years. 

Both got the job done, and in most cases quite well but as I'm getting older I find myself wanting to carry less and do more.  I'm reminded of the line from movie 'The Graduate' predicting (rightfully so I should add) the strong future in Plastics.  Which also reminds of this guy:  Lance Criscuolo a tried and true Texan who I photographed at Chicago Ideas Week (a smaller version of The Ted Talks).  His company Zyvex Technologies develops (in his words) ‘Carbon fiber on steroids.’  Here is his talk about recruiting and maintaining talent in the midwest if you wanna check it out:
 After his talk, I tracked him down and handed him my 5DmkII loaded with two batteries in the grip and the 70-200 f/2.8 mkII.  I dearly love shooting with that combo, sharp as a tack and the ability to practically see in the dark, I often joke it's my rainmaker, the downside is it's heavy as hell!  Carrying it all day certainly sends you to the medicine cabinet for an Advil or two and a glass of Pino.  I asked him how long until composites can provide the same level of precision and durability, stability through rugged temperatures and weather conditions.  He scratched is chin a bit and said hmmm in an encouraging fashion...Canon, our old bones are waiting!

So I told you all that so I can show you this:  I've always loved the look of the 65mm on 4x5 which I roughly equivalent to a 20mm on 35mm.  Oddly enough, I shoot mostly with a 24mm on 35mm, but anyway...

Almost 20 years ago I built this 4x5 super wide and got a remarkable amount of use out of it, both for personal work and a ton when I was the photographer at The Museum of Science and Industry.
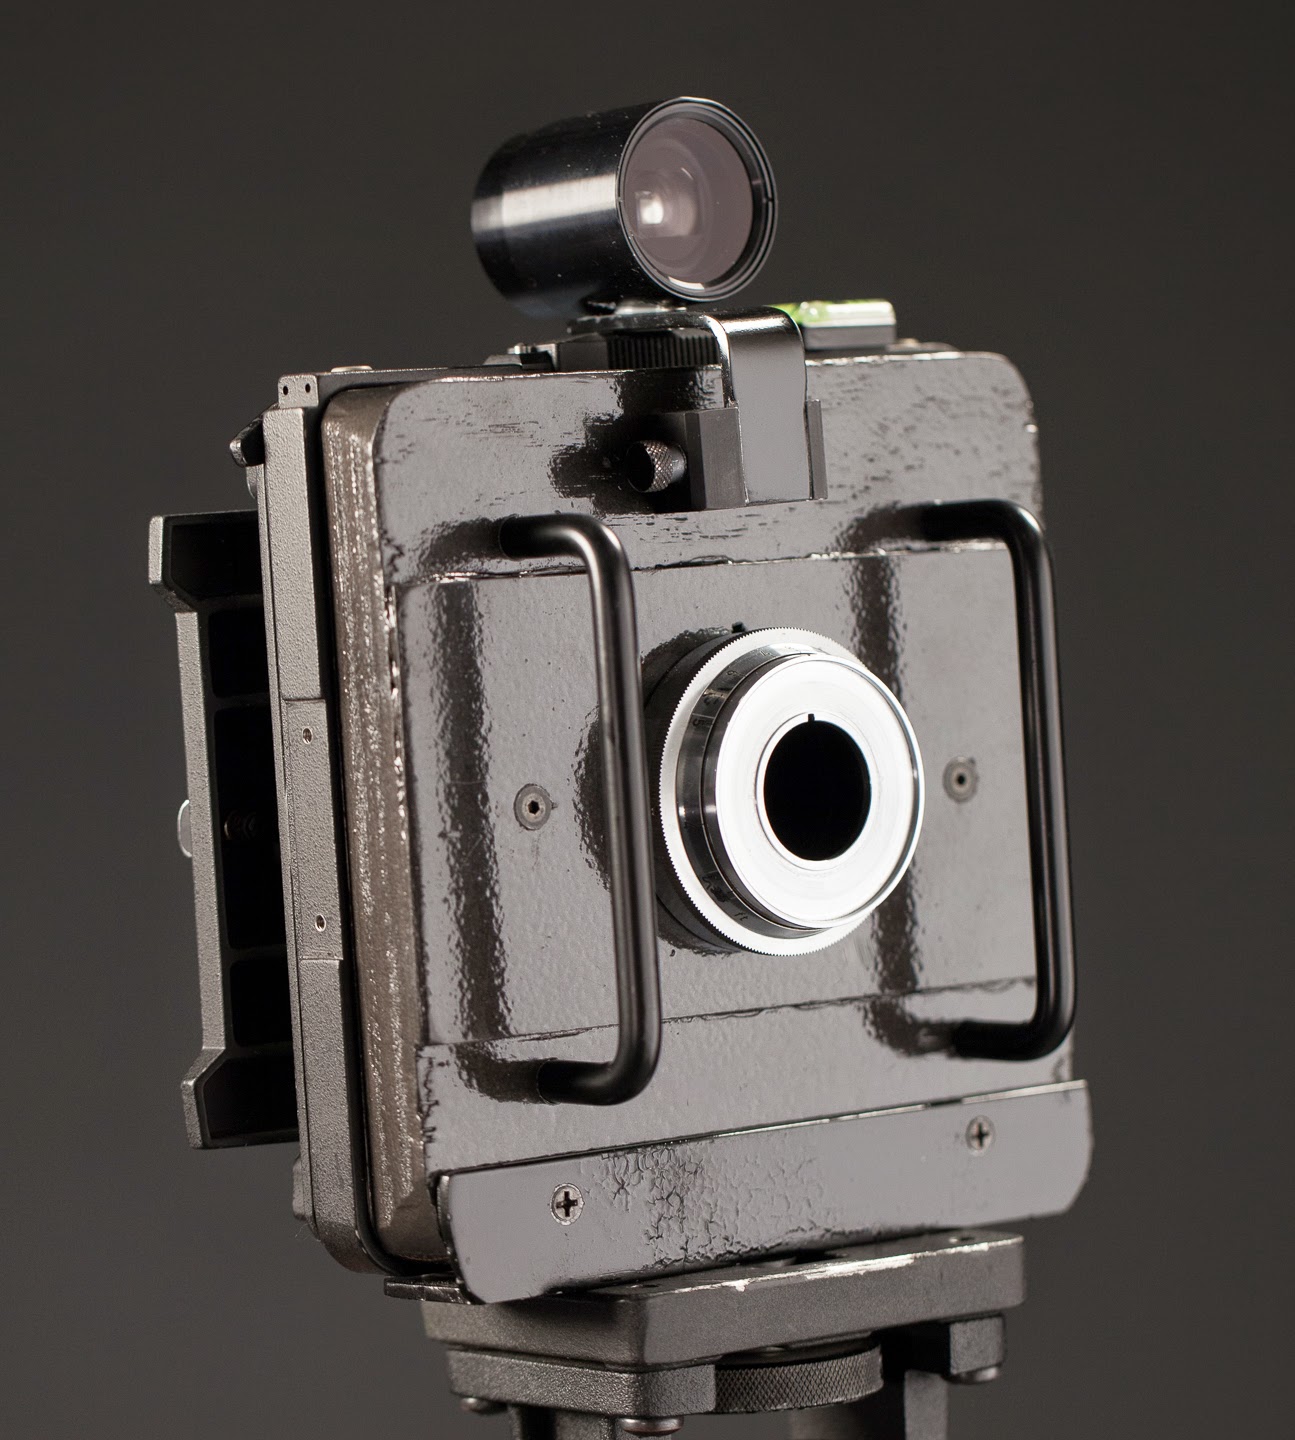
Digital came in and I jumped in head first without even thinking twice.  I love shooting digitally, it's current iteration is fantastic. I can truly make images that weren't possible ten years ago.  The sharpness digital is capable is staggering.  But as I said at the beginning, I'm longing for something else, something comfortable maybe, or possibly something different then everything that I've been inundated with.  I started dusting off some of the film cameras that I still have and began regretting the ones that I've sold off over the years.  Particularly I've been missing my 4x5 super wide.  So I sat down to design something more functional then my last one I came up with this.  Smaller with a rotating back (same huge finder) it achieved every goal I set out to solve but I forgot to consult my back.  Machined from solid hardwoods on a backbone of Cambo components it's quite solid, which we all know is a fancy way of saying heavy. 

I missed (by a long shot) my goal of having a compact 4x5 Superwide that can be stuffed in a bag with some film holders and carried alongside a 'digital job'.  I really likes the size of the camera, but with its weight I'm afraid it would never make it out the car.  Sooooo off to eBay it went.

Enter the Travelwide by Wanderlust Camera, made right here in Chicago.  A brilliant idea for a lightweight ABS camera that accommodates either a helical mounted 90mm Angulon or a fixed focus 65mm Super Angulon. Sounds perfect and as they are still hammering out details and refining production runs and aren’t shipping cameras (or returning emails) yet.

             Being impatient, I started making measurements of my Harmon Titan 4x5 Pinhole that was sitting on my desk and low and behold (that phrase is straight from my 74 year old mom btw) once you remove the pinhole and plane front flat the flange to focal plane distance is just about  the perfect distance needed for focus free, point and shoot operation.   

Here are a couple shots from its maiden run at the recently tornado stricken town of Fairdale Illinois. 

Ill follow up with a more detailed how-to if you would like to build your own super wide. In the mean time I'll see you shooting!